Cheap and Easy WOB Standard
Printed From: Nasgaweb
Category: Nasgaweb Forums
Forum Name: Training
Forum Discription: This forum is for discussion about training for the Scottish Heavy Events.
URL: http://www.nasgaweb.com/forum/forum_posts.asp?TID=16537
Printed Date: 3/26/26 at 3:32pm
Software Version: Web Wiz Forums 10.11 - http://www.webwizforums.com
Topic: Cheap and Easy WOB Standard
Posted By: TomLawrence
Subject: Cheap and Easy WOB Standard
Date Posted: 1/26/14 at 9:05pm
|
I had a couple of requests to post details about the WOB rig I showed in my TLOG, so here you go. Thank you to Rob Meulenberg for the inspiration. Parts List:
Construction:
Minimum height:  Set at 10':  Bolt adjustment: 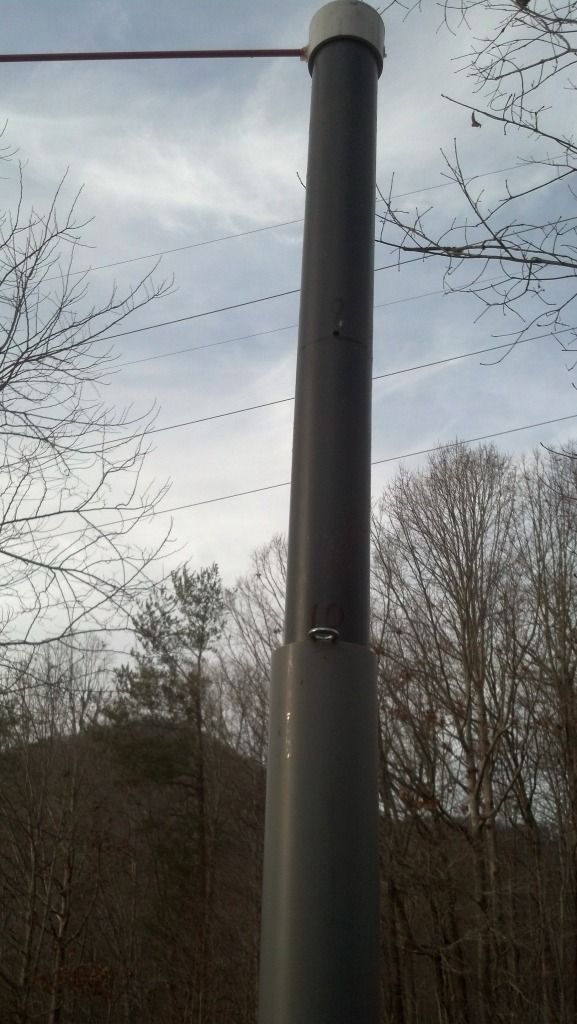 Throw higher. Tom ------------- Aim high. Stay hungry. |
Replies:
Posted By: Hapy
Date Posted: 1/26/14 at 10:09pm
|
pretty cool, and even relatively easy to move around. You could even throw in a couple bucks more and make two uprights to have a real crossbar that goes across, but then you might knock the whole thing down if you hit the bar incorrectly, so never mind - back to my extension ladder rig... ------------- Real Men Wear Purple Tinky Winky Throw Far! http://www.facebook.com/CVTSA" rel="nofollow - Central Vermont Strength Association |
Posted By: brandell
Date Posted: 1/27/14 at 6:38am
| Great Stuff Tom |
Posted By: rob meulenberg
Date Posted: 1/27/14 at 12:26pm
|
Tom, nice! Your setup looks a lot nicer than mine! Though I will add a note for any northerners who build this thing. Watch out if you keep it outside. I did, and ice has not only warped the bucket a bit, but also added a few inches to my expected height. When practiced last week, what I thought was like 15'6" was 16'6"!! ------------- www.sportkilt.com |
Posted By: Duncan McCallum
Date Posted: 1/27/14 at 1:11pm
|
Building mine this weekend.
16' fellas. ------------- The man in the arena. |
Posted By: TomLawrence
Date Posted: 1/27/14 at 1:23pm
|
I am happy to have contributed to the knowledge pool in any way. Y'all have been mentoring me from the beginning. "We drink! and WOB! and rhyme! and pillage!" Tom ------------- Aim high. Stay hungry. |
Posted By: Nathan Parker
Date Posted: 1/30/14 at 9:18am
|
Tom- I lived in GA for 5 years, and your pic reminded me of hunting in fall:) ------------- Sport Kilt JDJ Caber Company Hylete.com |
Posted By: BenEdwards
Date Posted: 5/23/14 at 2:53am
|
That's a great idea, and thanks for sharing Tom! I just printed this off to use when I get my welded handle for my homemade 56lb WOB implement. ------------- http://goalorientedtraining.wordpress.com/ |
Posted By: mike landrich
Date Posted: 5/23/14 at 12:19pm
|
Guys Instead of the PVC, there's a product called TELESPAR. Its the perforated square tube that is often used for traffic signs. Its sized so each size slides inside the next larger size. Get 2 10 or 12' lengths and you have a standard that is adjustable in 1" increments, using a simple lynch pin attachment. It will cost more (probably around $75 for the 2 pieces), but is a better product You could simply have a stake in the ground and slide the TELESPAR over it, or use a u-clamp to hold the telespar to the stake ------------- "Never argue with an idiot. He'll drag you down to his level and win by experience"-Mark Twain |
Posted By: BrittneyBoswell
Date Posted: 5/23/14 at 2:47pm
|
Hey, Mike, where can this be readily purchased? ------------- Highland Games - The drama is so high, because the stakes are so low. |
Posted By: mike landrich
Date Posted: 5/23/14 at 3:46pm
According to Google http://www.unistrut.us/index.php?WP=contact_locate_us4&ZIP=&ST=TX&City=dallas&Product=Telespar&Market=Mechanical&Action=Continue ------------- "Never argue with an idiot. He'll drag you down to his level and win by experience"-Mark Twain |
 BrittneyBoswell wrote:
Posted By: mike landrich
Date Posted: 5/23/14 at 3:49pm
|
Also, call and talk to them. Tell them what its for. There are different gauges: I'd go with 12. Maybe they'll give Duncan a discount if he lets them put up a banner at a Games? ------------- "Never argue with an idiot. He'll drag you down to his level and win by experience"-Mark Twain |
Posted By: mike landrich
Date Posted: 5/23/14 at 3:54pm
|
And online prices are never correct. Pickup is always different: pay cash and its quite often substantially less ------------- "Never argue with an idiot. He'll drag you down to his level and win by experience"-Mark Twain |
Posted By: TomLawrence
Date Posted: 5/25/14 at 3:54pm
|
You are a good man, Mike Landrich. Tom ------------- Aim high. Stay hungry. |